Archive | September, 2013

Kids and Chemicals

23 Sep

We left off covering some bands I’ve had the pleasure of working with and the microphone choices that made their sound possible.  While I did my best to include video of the musician/microphone combos, a brief lapse in judgement left me omitting one very unique example.  

Kids and Chemicals is gearing up to release an EP on October 8th featuring five new tracks.  “Pale Horse” is currently available for pre-order on CD and limited-edition, purple cassette.  Both options include an immediate download of a single track of your choice and digital copy of the EP (MP3/FLAC/etc) upon release.

In honor of the upcoming release and to provide you with yet another audio/visual sample of microphones at work, I leave you with a clip of Kids and Chemicals playing the track “Out My Window” at the Gillioz Theatre.


Pictures of Microphones

15 Sep

I love pictures of microphones.  I could browse the web for days just looking at and reading about various mics.  There are so many different kinds with a variety of applications and sonic possibilities.  In browsing the photo album on my phone, I realized I have gathered a decent collection of shots featuring collections of microphones I’ve used on assorted gigs.  While I wish I had been more consistent in taking these photos and collected pictures from every show I’ve mixed, I would like to showcase a few in today’s post.

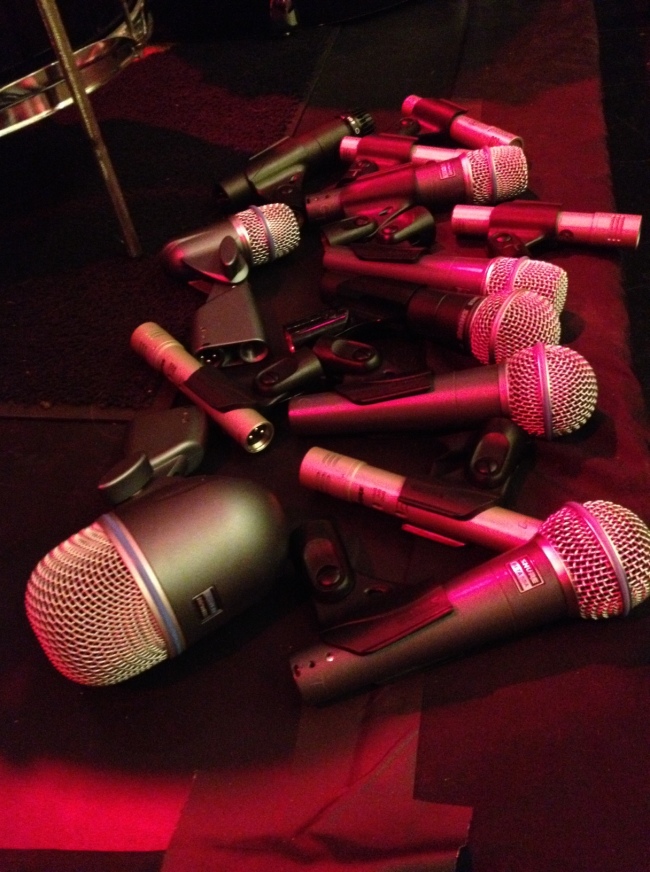
First up, the photo that started it all.

Image

I started taking these pictures after a Springfield church chose the Gillioz Theatre to host their annual holiday variety show.  When striking a stage, I always start by pulling all mics (and clips, if stored with) from their stands and putting them in one place so I can keep watch and get them back to their homes as quickly as possible to avoid the possibility of any microphones “walking off” in the rush of load-out.  It was something about the sight of this chair-full of microphones that prompted me to whip out the camera-phone and snap a picture.  My pile makes it a bit hard to see all the models, but I believe this night’s package, which as with all the following selections were selected by yours truly, featured the following:

  • Audix D6 (kick)
  • Audix D4 (floor tom)
  • Shure KSM137 (drum overheads–the Gillioz is a very live room and I often would choose to not close mic toms)
  • Shure SM57 (guitar cabs)
  • Shure SM58 (vox)
  • Shure Beta 58 (vox)
  • Shure SLX2 wireless handheld with Beta 58 capsule (emcees)

This show was quite some time ago and, as most church bands do, featured a wide variety of instruments and players, so I don’t remember the exact input list.

Now let’s look at a photo from Delta Sol Revival playing First Friday Live at the Gillioz Theatre.

Image

I’ll do my best to reconstruct the input list (audience mics added for recording purposes):

  1. Kick – Shure Beta 52A
  2. Snare – Shure SM57
  3. Overhead L – Shure KSM137
  4. Overhead R – Shure KSM137
  5. Aux Snare – Shure Beta 57A
  6. Aux Percussion – Shure KSM137
  7. Bass Direct – Radial JDI
  8. Bass Cab – Shure Beta 56A
  9. Keys L – Radial JDI
  10. Keys R – Radial JDI
  11. Guitar – Shure Beta 57A
  12. Sax – Shure Beta 58A
  13. Aux Vox – Shure SM58
  14. Lead Vox – Shure SM58
  15. Audience L – Shure KSM137
  16. Audience R – Shure KSM137

This package was comprised completely of the Gillioz Theatre’s house inventory, which is obviously all Shure.

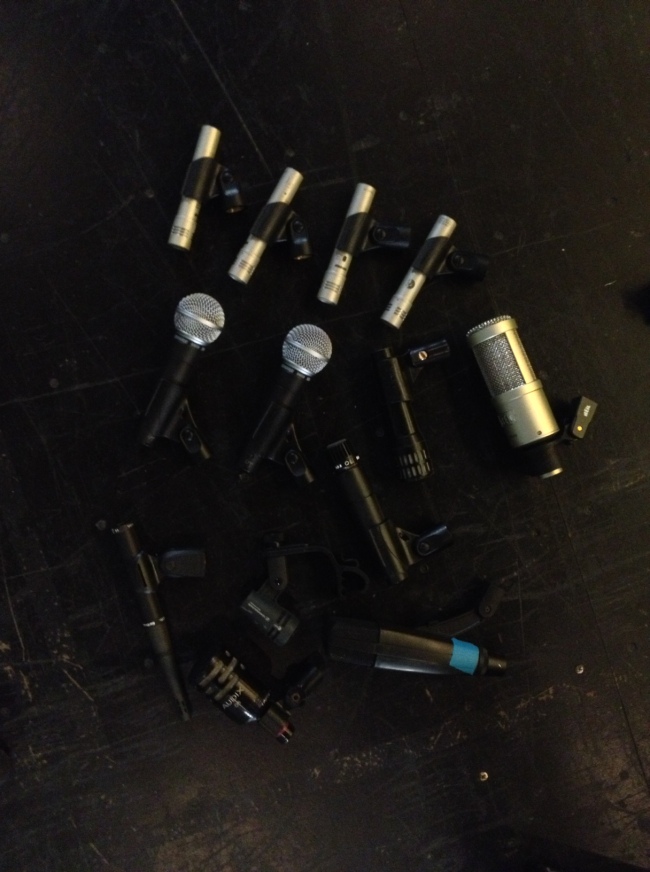
Next up, mics used for J-None’s First Friday Live performance.

Image

For this show I supplemented some of my own mics to compliment the theatre’s Shure package.

  1. Kick – Audix D6
  2. Snare- Shure SM57
  3. Hi-Hat – Earthworks SR20
  4. Rack Tom – Sennheiser e604
  5. Floor Tom – Sennheiser e604
  6. Overhead L – Shure KSM27
  7. Overhead R – Shure KSM27
  8. Guitar – Sennheiser MD421
  9. Tracks L – Radial JDI
  10. Tracks R – Radial JDI
  11. Aux Vox – Sennheiser e835
  12. Lead Vox – Shure Beta 58
  13. Audience L – Audix ADX51
  14. Audience R – Audix ADX51

You’ll notice I always use the Shure SM57 on snare.  I just can’t argue with the results.  The KSM27s worked okay on for overheads, but lacked a bit of the pattern control I prefer to create a wide stereo image.

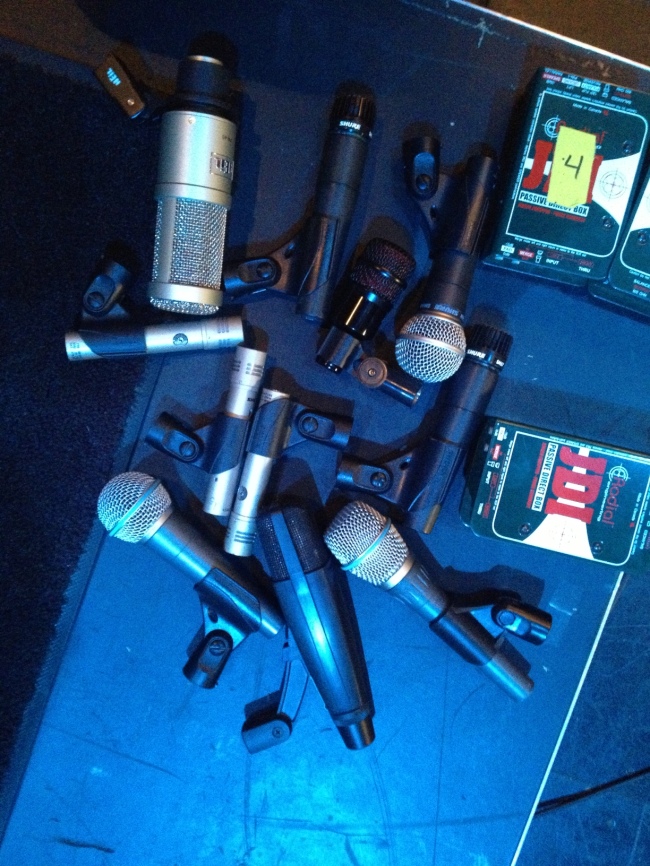
The next feature is from one of my personal favorite Springfield, MO bands, The Bootheel.

Image

  1. Kick – Audix D6
  2. Snare – Shure SM57
  3. Rack – Sennheiser e604
  4. Floor – Sennheiser e604
  5. OHL – Audix ADX51
  6. OHR – Audix ADX51
  7. Bass Direct – Radial JDI
  8. Bass Cab – Audix D4
  9. Guitar SR – Audix i5
  10. Guitar SL – Shure SM57
  11. Drum Vox – Shure Beta 56A
  12. Aux Vox – Shure SM58
  13. Lead Vox – Shure SM58
  14. Audience L – Shure KSM137
  15. Audience R – Shure KSM137

This is when I fell in love the Audix D4 on bass cab.  This was also my first time using the Beta 56A for drum vocals, which worked really well as Warren, drummer for the Bootheel, adds a lot to the music with his harmonies, but also hits incredibly hard, which can be difficult to work with in the mix.  The Beta 56A provided good rejection of the drum kit and with a little HF rolloff on the console EQ, kept extra cymbal bleed to a minimum.  If I could do this again, I’d move the Shure KSM137s to the kit, as I’m not sure I like the ADX51 for overhead use.

Moving right along, here is the package used for Someone Still Loves You Boris Yeltsin when they opened for Neon Trees at the Gillioz.

Image

For this show, I opted to omit the overheads. As the opening act, SSLYBY was set downstage of the proscenium opening and main drape. I felt there was no need to reinforce the cymbals as I knew the room would take care of that and some bleed would inevitably make it into the vocal channels.

  1. Kick – Audix D6
  2. Snare – Shure SM57
  3. Rack – Sennheiser e604
  4. Floor – Sennheiser e604
  5. Bass Direct – DI in head
  6. Bass Cab – Audix D4
  7. SR Guitar – Heil PR40
  8. SL Guitar – Sennheiser MD421
  9. Vox 1 – Shure SM58
  10. Vox 2 – Shure SM58
  11. Drum Vox – EV N/D857B

This was a great mix–and only 11 channels!  I’m a big fan of large-diaphragm dynamics on guitar cabs.  The cab on which I used the Heil PR40 is one I had worked with before and was always challenged to keep it from sounding harsh.  The PR40 tamed the tone nicely, requiring no console EQ other than a simple high-pass filter.  The EV on drum vocals worked beautifully.  SSLYBY likes to switch places on stage, moving from instrument to instrument between songs, and when one particular member sings behind the drum kit, it can be quite the challenge to get his vocals to stand out in the mix.  He sings softly and plays hard.  My dad gave my this N/D857B when I was about 12 years old, and it has been in my collection ever since (honestly, I’d say it started my collection).  I had it with my that night and decided to give it a shot.  The hyper-cardioid pattern rejected all the stuff I didn’t want and the mic’s response curve worked great for his vocals.  My only complaint is that EV no longer makes it.

Here we have a photo from Kids & Chemicals playing First Friday Live.

Image

Kids & Chemicals is an electronic group backed with live drums.  This freed up the resources to go a little crazy on the drum mics, which I am always happy to do.

  1. Kick In – Audix i5
  2. Kick Out – Audix D6
  3. Snare Top – Shure SM57
  4. Snare Bottom – Sennheiser e604
  5. Hats – Earthworks SR20
  6. Rack – Heil PR40
  7. Floor – Sennheiser MD421
  8. OHL – Shure KSM137
  9. OHR – Shure KSM137
  10. Tracks L – Radial JDI
  11. Tracks R – Radial JDI
  12. Vox w/ FX from stage – Shure SM58 > Focusrite Saffire 2i2 > Radial JDI
  13. Crowd Address – Shure SM58
  14. Audience L – Shure KSM137
  15. Audience R – Shure KSM137

I really liked using the Sennheiser e604 for snare bottom as it required no stand in an already crowded space.  The Heil PR40 and Sennheiser MD421 on toms were great.  Also, the Earthworks SR20 just feels right on hats–very fast and articulate.

Finally, a shot from the last band I mixed at the Gilly, Plaid Dragon.

Image

  1. Kick – Heil PR40
  2. Snare – Shure SM57
  3. OHL – Shure KSM137
  4. OHR – Shure KSM137
  5. Bass – Radial JDI
  6. SR Guitar – Sennheiser MD421
  7. Center Guitar – Audix D4
  8. SL Guitar – Shure SM57
  9. Acoustic Guitar – Radial JDI
  10. Ukulele – Radial JDI
  11. Synth – Radial ProDI
  12. Upright Bass – Radial JDI
  13. Violin – Shure KSM137
  14. Aux Vox – Shure SM58
  15. Drum Vox – Shure Beta 58A
  16. Lead Vox – Shure Beta 87A

The Beta 87A for lead vocals belongs to Inge, the lead singer, and sounds wonderful on her voice.  The D4 helped add some meat to her small, single 10″ guitar amp.  I had owned the PR40 for a while at this point, but had never tried it on kick, which all the studio rats rave about.  As you can tell from previous input lists, I’m quite partial to the D6, but Plaid Dragon is a bit “unconventional” so I felt it was an appropriate time to get a little crazy myself.  The results were excellent and I look forward to using the PR40 on kick again when appropriate.

DIY Klipsch Heresy Baffle Seal

10 Sep

In light of the recent coverage on Klipsch Heresy capacitor replacement, I’d like to follow up with an even easier upgrade for your compact, sealed wonders that costs about $5 and takes less than 5 minutes to install.

Let’s first look back at the term “sealed.” The Heresy got its name because it was such a radical departure from the previous designs of Paul Klipsch, which revolved around large, ported cabinets, 15″ woofers and folded bass horns to improve low frequency response. With the Heresy, Klipsch broke many of his own design principles, achieving quality, full-range sound from a relatively small, sealed enclosure, housing a front-loaded 12″ woofer.

Now I can’t speak for the second and third generations of Heresy cabinets, but the original boxes have a removable rear panel, secured with eight Philips head wood screws. The panel simply butts up against a 3/4″ strip of wood around the perimeter of the box interior. While this does secure nicely when screwed down tightly, I’m skeptical of the wood on wood air tight-ness–an important detail for a sealed speaker design to adequately reproduce low frequencies.

Here’s the part where you go to the local hardware store and pick up some foam weatherstripping like you would use to eliminate drafts from door jams and window frames. You’ll need at approximately 136 linear inches of the stuff (11′ 4″) to seal one pair of speakers. It comes in several different widths. I chose the 1/4″ variety, which in reality is closer to 1/3″ wide. If you wanted to really go for overkill, you could spring for the 1/2″ or 3/4″, but the wider you buy, the more you should plan to spend. It does spread out in width a bit when compressed, so I feel the 1/4″ stuff does the trick. It also fits nicely between the edge of the cabinet and the existing screw holes.

20130910-123438.jpg
Application, just pull the tape off the adhesive backing, apply a strip of the weatherstripping around the perimeter of the cabinet and replace the rear panel.

Don’t expect a night and day difference, but those who know the Heresy will welcome any help in the LF department. The expansive properties of the foam also apply pressure against the back panel, helping keep the screws tight and eliminating possible vibrations and rattles in the rear baffle.

Just another step to ensure your Klipsch Heresy speakers are operating at their highest potential for many more hours of listening pleasure.

Klipsch Heresy “Type E” Capacitor Replacement

8 Sep

Eight years ago I picked up a beautiful set of Klipsch Heresy speakers.  My dad used to sell hi-fi in the 80s and one day an old friend and former customer called him up to say he was moving to Florida and letting go of his stereo (apparently they don’t allow nice stereos there).  We went over to his house and auditioned what he had, which included this first generation Klipsch Heresy pair.  After a brief listening session I couldn’t help but take the speakers home with me.

There are some fairly heated debates among hi-fi buffs over whether or not the Heresys are worth a damn. Some listeners hate them, some love them.   I happen to be in the latter camp, so I’ve toted them along from place to place, most recently in my cross-country move to Montana.  They always manage to find their place in my primary listening system, driven by a Kenwood M2A at 220 watts/ch.

With a manufacture date of sometime in 1980, these particular speakers are now 33 years old.  They have been well cared for throughout their lives.  The cabinets are in excellent condition and all the drivers are original, with the exception of diaphragm replacements in both K-77 tweeters.  I had one die on me a couple years ago and opted to replace the HF diaphragms in both speakers for sonic consistency, with genuine Klipsch parts, of course.

Even when well cared for and used properly, the capacitors in the crossover network are bound to fail to some extent over time.  The “Type E” crossover network found in Klipsch Heresy speakers up to 1982 consists of two capacitors, two transformers and a wiring block.  All capacitors have a lifespan.  While in a few rare instances they die suddenly when overdriven, they usually tend to drift off spec with age.  Of course, as the caps drift off spec, so does the sonic character of your speakers.

Mine seemed to sound fine, but I figured they deserved some maintenance after several years of faithful service.  I’m a bit of a novice when it comes to replacement of electronic parts such as this, so I didn’t feel comfortable sourcing my own capacitors.  Luckily, a gentleman by the name of Bob Crites has replacement kits available on his website.  Within a few days I had four caps and a wiring diagram on my doorstep.  Time for some fun.

Image

It’s pretty easy to remove the crossover, or “balancing network,” as Klipsch calls it.  Loosen the screws on the wiring block for the three pair of driver leads and the rear panel input, remove two screws for board the x-over components are mounted to, and the whole network comes right out.

Image

Isn’t that steel label plate cool?  The two old capacitors are those oil-can looking things, located top center-ish on the board.  Note the rust starting to build up on the outside–yeah, pretty old.  Just clip the leads, unscrew them from the mounting plate and you’re ready to install the new caps.  Along with new Sonicap capacitors (rated at twice the voltage of the original caps), Bob also includes mounting blocks and zip ties, leaving you with everything you need to complete the task minus some solder and an iron.  Mount the new caps, consult Bob’s included wiring diagram (or take detailed pictures of the crossover before you remove anything), sling some solder and there you have it.

Image

It took less than an hour to pull and update and reinstall the crossovers for both speakers.  Not a bad Saturday project–plenty of time left over for a bike ride, a drink or an extended listening session with your refreshed speakers–or all of the above.

Let me take a step back and say that I had no proof my old capacitors were “bad.”  Again, bad caps can continue to work, just not to their original specifications, so even though my speakers seemed fine, they may very well have strayed from their original sonic signature.  My personal stash of electronic testing tools is limited to a couple of multi-meters, so there was no scoping to be had.  However, I do own a cheap Dayton EMM-6 measurement microphone, a USB audio interface and a computer.

Before I even unhooked the speakers for their surgery, I downloaded a trial version of FuzzMeasure and set up a little measurement rig.

Image

While the angle of the photo is a little misleading, I placed the microphone so its capsule was one foot off the grill, pointing about halfway between the tweeter and woofer–pretty much right at the K-55 midrange driver Klipsch lovingly named the “squaker.”  I put some tape on the floor to make sure got things back in the same place for my post-installation measurement.  I measured the speaker, swapped the caps as described above, then measured again.  Below are the two measurements overlayed.

Image

As you can see the response stayed more or less the same.  A slight gain in HF output and a little change in the transition zone between the LF and MF drivers.  Of course these measurements aren’t perfect, but it is nice to have a visual representation.  But do they actually “sound” better?

Verdict: Experiments like this are often hard to judge.  You’ll read all sorts of ambiguous adjectives when looking at others’ accounts of capacitor replacement.  “The soundstage was vastly improved.”  “A sparkle was restored that I hadn’t heard in years.” “I discovered a 4th dimension after replacement.”  Yadda, yadda, yadda.  While I cannot say right off the bat this “upgrade” drastically changed my speakers’ sound, I can say the project was greatly rewarding.  These speakers have been with me for many years and have never let me down.  Day after day, night after night they enable me to listen to music.  If nothing else, this endeavour is an insurance policy that our relationship will last many years more.